hostess with the mostest… cupcakes, that is

Some people Google-search their crushes, or their exes, their favorite celebrities or hottest trends. Me? I Google-searched my favorite childhood snack cakes the other day.

Growing up in Montreal, sleepover parties and special bagged lunches were not complete without a Vachon brand snack cake, namely a delightful and creamy May West treat.

As I flipped though images of these delicious snacks, I was reminded of the iconic Hostess cupcake that was so scarcely available in my neck of the woods. I remember tasting one for the first time on a road trip across the border and deciding that these cupcakes were absolutely adorable to look at and super-fun to eat!

Feeling inspired to jump on the bandwagon of bakers who have created their own homemade takes on this classic, I decided to try my hand at it. My goal was not to recreate the exact flavor, I live dangerously close to a 7-11 that carries the real thing if that if what I am after.

Instead, I used the flavor and composition as my guide and selected my favorite recipes for each element in order to produce a delicious, fancier-pants version. With this system as my template I am feeling pretty excited about making even more flavor variations.

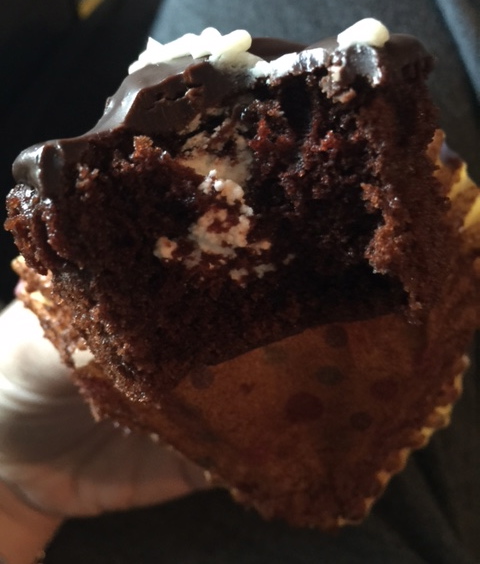
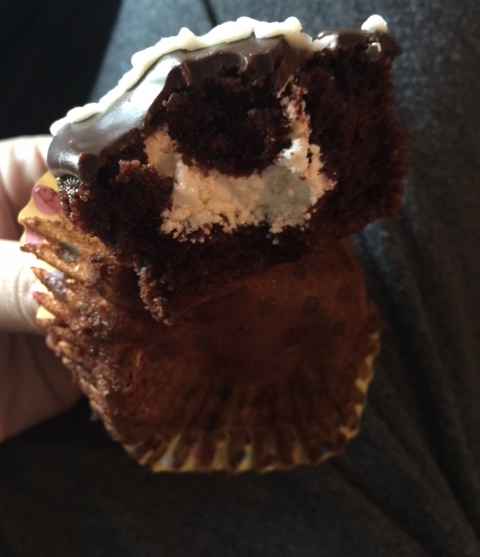
But for now, I will enjoy the infallible combination of moist chocolate cake, fluffy light-as-a-cloud white icing and deep chocolate ganache.

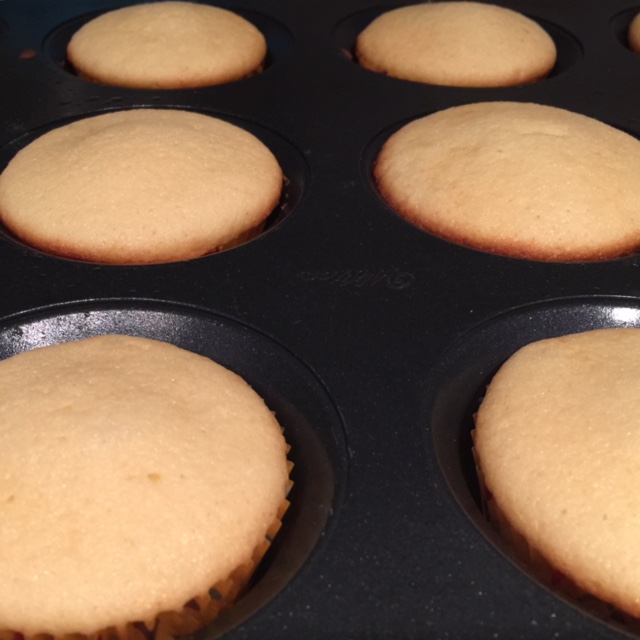
I made my favorite chocolate cake recipe but divided it into lined muffin tins. I let these cool and rest overnight. Breaking this process up between two days helped saved me some energy and some mess.

image2

I got my whipped filling on the go. I debated using jacked up marshmallow fluff, but settled on a light vanilla cream frosting for the centers of my cakes.

image5

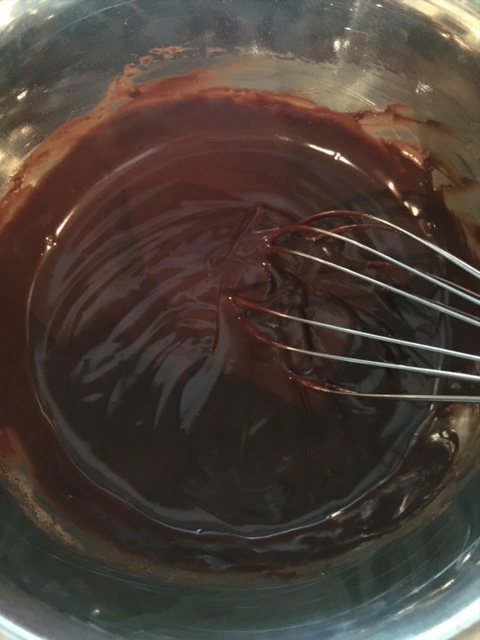
With my mixer on the go I heated up some cream to pour over my chopped semi-sweet chocolate, resulting in the creamiest dreamiest ganache.

image4

I cored my cupcakes, saving the scooped out portion to place back on top after piping the cavities with the fluffy filling.

image7

After sealing in the cupcakes with their previously removed cores, I flooded the tops with my cooled, glossy ganache. I whipped up a fraction of my usual Classic Buttercream icing recipe while to cupcakes chilled to set.

image8

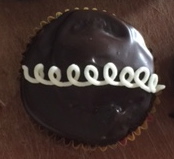
I piped a little design on the tops of the finished treats and wasted no time completing a very thorough taste-test!

image10 image11

Advertisement

omnomnom cupcakes

As someone who has a well documented penchant for cookies and an overall appreciation for yummy food it should not come as a surprise that I wholeheartedly relate to Cookie Monster’s unbridled enthusiasm for treats. I’ll bet everyone can in some capacity! Everybody’s got a vice whether it’s drinking, smoking, spending, gaming, gambling or whatever else… For me (and Cookie Monster) it is omnomnom-ing my way through a pile of goodies.

My love for food and regular practice of seeking too much comfort in its sweet nourishment have led me on my own personal journey. Over the years and with some help, I have learned to manage and maintain a healthy weight, enjoy indulgent treats in moderation and even make more informed decisions about what I splurge on.

All that being said, one thing that has NEVER wavered is my utter joy at the sight, smell and taste of a freshly baked good. Even though I have come a long way to feel in control of my cravings, it’s still not easy to eat just one! Nobody understands this and portrays this with more accuracy than my honest to goodness spirit animal, Cookie Monster.

Obviously I HAD to make this insanely adorable confection as a tribute:

omnomnom cupcakes

IMG_1080

First, I baked up a batch of Nestle Toll House cookies. I dropped them from a teaspoon measure and reduced the bake time by a couple of minutes in order to make perfectly delicious miniatures.

IMG_1081

Next, I made classic vanilla cupcakes. Any recipe would do but I knew I would be making a buttercream frosting and vanilla on vanilla always gets my vote!

I used a standard recipe for buttercream mixing in Royal Blue gel food coloring until it looked like muppet and adding sifted icing sugar in small increments until I got the right consistency for piping.

IMG_1082

Cookie Monster wastes no time on hair care so I went to town making his icing fur all haphazard and messy. I love when there’s no fear of messing up and such is the case with these little guys. The eyes were fashioned out of white candy melts and chocolate chips. I used a little frosting as an adhesive.

That knife in the background cut a slit so that the mini cookie could be inserted into the mini-monster’s “mouth”.

Et voila!

IMG_1083

sugar-bunny mini egg cookies

It’s almost Easter. Almost. But you know what’s happening RIGHT NOW? Mini Eggs! The beloved Cadbury bunny is clucking away on TV and Mini Eggs are back on the shelves of grocery stores and pharmacies everywhere! Yum Yum Yum!!! Can you tell I’m excited?

IMG_0725

That’s because these pastel colored beauties are my absolute favorite Easter chocolate. Given my deep and unending love for cookies it was only a matter of time before I would put the two together to create the ultimate Easter themed cookie treat.

IMG_0722

To make these I used my usual recipe for cut-out sugar cookies. I then placed about 2 to 3 cups of Mini Eggs in a large Ziploc bag and had myself a blast smashing them to smithereens with the back of a heavy ice cream scooper!

IMG_0723

I could have used my mini food processor but that only occurred to me once I was already in quite the groove. A mallet or rolling pin would have also done the trick but clearly I have a penchant for the unconventional…

IMG_0719

As I normally do, I rolled the dough out fairly thick because i prefer a slightly softer cookie that I can really sink my teeth into. I kept bake time the same as always and they turned out perfectly! Little bits of shell and tiny chunks of Cadbury chocolate are visible in the dough making the cookies look almost as ridiculously delicious as they taste. Almost.

IMG_0721

reese’s pieces be nice chocolate chip cookies

Today I am feeling totally out of sorts. The truth is I have been feeling sort of blue these days. Maybe it is pure coincidence but I have been hearing all kinds of deflating stories about mean people lately.

It seems that the same bullies we witnessed as kids in our elementary school classes rear their ugly heads again in a great many of our workplace settings today.  The passive-aggressive comments, back-stabbing and cliques appear to be cropping up in my friends’ stories and my own life.

Life is so short and offers up so many uncontrollable and unforeseeable  obstacles and heartbreaks – why must anyone go out of their way to make things worse for another person? The only consistent explanation I can come up with is that this bad behavior almost always comes from a place of deep insecurity.

I am certainly not perfect, but I am no bully. When I feel insecure but not quite ready to deal with my feelings – I EAT them! That’s right. I’m not saying that it’s a great coping mechanism but it is effective in extreme situations and far nicer than making someone else feel awful.

Getting home from work tonight I couldn’t even make it all the way into my pajamas. A silky sleep shirt and tights was the haphazard and incomplete look that reflected my mood perfectly. I decided to bake up a batch of cookies that I will bring to work tomorrow. Hopefully my crusty coworkers will benefit from my therapy of choice – cookies.

I had a bag of Reese’s Mini Pieces on hand and decided to mix them with chocolate chips and stuff them into GIGANTIC cookies. The kind so big and scrumptious that they make your mouth too full to say mean sh*t!

Here is the recipe I threw together for Reese’s Pieces Be Nice Chocolate Chip Cookies:

Ingredients:

  • 4 cups of all-purpose flour
  • 1 teaspoon baking soda
  • 1 teaspoon baking powder
  • 1 1/4 cups white sugar
  • 1 1/4 cups brown sugar
  • 2 eggs
  • 2 teaspoons pure vanilla extract
  • 1 package Reese’s Mini Pieces, or about 2 cups of regular Reese’s Pieces
  • 1 package of chocolate chips, I used milk chocolate… and ate a bunch before they made their way into the dough…

image2

Preheat oven to 375 degrees F

Mix flour, baking soda and baking powder together in a medium bowl and set aside.

Next, beat butter with sugars together. When this mixture looks light and creamy, add eggs and vanilla and beat until combined.

Add the flour combo in thirds and mix until flour disappears.

Dump the Reese’s and chocolate chips into the dough and work them in until they are evenly dispersed.

Use a quarter measuring cup to scoop uniform balls of dough onto a lined cookie sheet, leaving about two inches of space in between.

image6

Bake for approximately 12 minutes and allow to cool on a wire rack … before taste testing at least one cookie from each tray that comes out of the oven:)

I made some smaller cookies by using a tablespoon to measure out a consistent size and baked them at the same temp for 9 minutes.

hamantaschen-ish

Between my husband, myself and my family, we celebrate pretty much every major holiday. This means lots of traditions shared and a great deal of feasting! Easter and Passover are just around the corner but this week I hosted a small gathering in honour of the Jewish holiday, Purim. 

Acknowledging Purim entails listening to the story of the holiday, giving to charity, sending gifts of food and having a big feast that usually includes Hamantaschen (triangular shaped cookies filled with one of many fillings). Some even dress up in costume, traditionally as the heroes of the Purim story.

Stories, helping others in need, baking for friends, eating cookies, AND an excuse to top my pajamas off with a Queen Esther crown? This is my kind of holiday!

This was my first attempt ever at making Hamantaschen from scratch and was a delectable failure! All of the elements were spot on but the triangular cookies I carefully placed in the oven opened up during baking. Sad face.

They ended up looking somewhat like confused thumbprint jam cookies but tasted like Hamantaschen heaven. No lie. Yum!

The moral of this baking story? Don’t worry too much about messing up or making mistakes. Have fun, use yummy ingredients and you might end up with a perfect dessert or a perfectly delicious mess!

HAM1

Here is the simple recipe I like to use for Hamantaschen dough, it is not overly sweet and balances perfectly with whatever decadent filling you choose. I used a simple and traditional prune filling for some and a new-school toffee cheesecake filling for others (recipe down below).

Hamantaschen Cookie Dough:
  • 1 cup unsalted butter, room temperature
  • 1 cup cream cheese, room temperature
  • 2 cups flour
  • 1/4 cup powdered sugar
Beat the butter and cream cheese together until light and creamy. Slowly add the flour and sugar until fully combined. Finally, form the dough into a ball, wrap tightly and chill overnight.
DOUGHBALL

Let the dough ball rest at room temperature for 30 minutes and then roll it out to approximately 1/4″ thickness. Using a 3″ round cutter, or in my case the top of a drinking glass, cut out circles.

As is the case with any rolled cookie, remove the surrounding scraps of dough to be re-rolled for more cookies.

Place a small dollop of filling in the centre of each cut circle.

Next, fold one edge of the circle inward to begin making a triangle. As you fold each third pinch the corners together with a drop of water to ensure a tight seal. This may be where I seriously dropped the ball!

Bake them at 400 F for 12-15 minutes, until they start to look slightly golden.

In any case, I served them up with a sense of humour and a pot of coffee and they were ALL gobbled up by the end of the night. Turns out looks aren’t everything!

HAM2

The cream cheese filling was an experiment and a total hit. It can be piped into cupcakes, stuffed into cookies or scooped up on a graham cracker. It’s like cheesecake’s answer to Nutella.

To make it:

  • 1 cup or 8 ounce package of cream cheese
  • 1/3 cup granulated sugar
  • 1/2 teaspoon pure vanilla extract
  • 1/4 cup toffee bits, approximately

Beat the cream cheese, sugar and vanilla together until the mixture looks well combined and irresistibly smooth. Stir in as many toffee bits as you like.